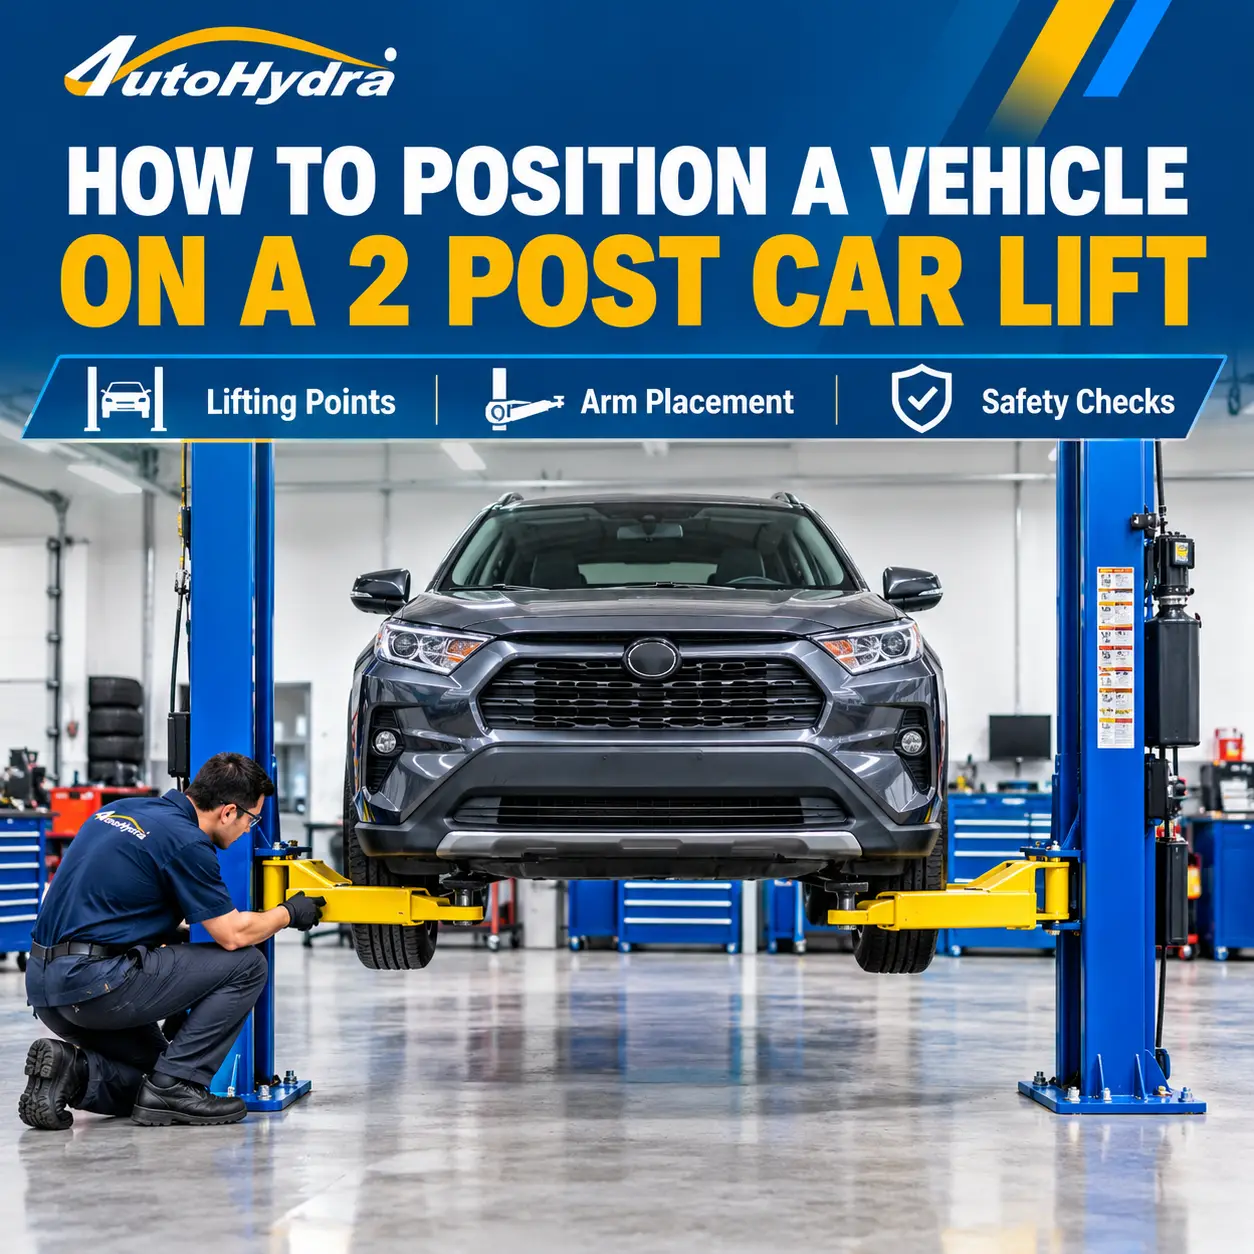
How to Position a Vehicle on a 2 Post Car Lift: A Step-by-Step Guide
Positioning a vehicle correctly on a 2 post car lift is essential for safe lifting, stable support, and efficient automotive repairs. Even a lift with sufficient rated capacity can become unsafe if the vehicle is off-center, the lift arms are incorrectly positioned, or the lifting points are not approved for that vehicle.
Whether you work in a professional repair shop or a home garage, the correct procedure starts before the lift is switched on. You need to identify the vehicle's approved lifting points, position the vehicle between the columns, adjust the lift arms, and verify that all contact points remain secure during the initial lift.
This guide explains how to position a vehicle on a 2 post car lift, highlights common mistakes, and provides a practical checklist for safer lifting.
⚠️ Important safety note: Always follow the lift manufacturer's operating manual, the vehicle manufacturer's lifting instructions, and applicable workplace safety requirements. The procedure below is a general guide, not a substitute for model-specific instructions or hands-on training.
1. Understand How a 2 Post Car Lift Supports a Vehicle
A 2 post car lift typically uses two upright columns with adjustable lifting arms. The arms extend beneath the vehicle and support it at designated lifting points rather than supporting the tires on runways.
This design provides access to the wheels, suspension, brakes, and much of the undercarriage, making it a common choice for general automotive repair.
However, a vehicle must be positioned correctly so that its weight is distributed within the lift's approved operating limits. The correct arm arrangement depends on the lift design, vehicle dimensions, lifting-point locations, and the manufacturer's instructions.
Before positioning a vehicle, understand these three principles:
📍 Approved lifting points: The lift pads must contact locations approved for lifting that specific vehicle.
⚖️ Correct weight distribution: The vehicle must be positioned according to the lift manufacturer's requirements for its center of gravity and load distribution.
🔒 Secure contact: Each arm and pad must be properly placed and remain stable during the initial lift.
📖 If you are still selecting equipment, read AUTO HYDRA's Car Lift Capacity Guide to understand why rated capacity is only one part of a suitable lift setup.
2. Prepare the Vehicle and Work Area
Before driving a vehicle onto a 2 post car lift, inspect the work area and prepare the vehicle.
2.1 Check the Lift and Floor
Confirm that the lift is installed correctly and that the surrounding area is suitable for the intended operation.
Check the following:
✅ The lift is installed according to its manufacturer's specifications.
✅ The floor, anchors, columns, and visible structural components show no obvious damage.
✅ The lifting arms, pads, adapters, and mechanical safety devices are in serviceable condition.
✅ The area between and around the columns is clear of tools, equipment, and other obstructions.
✅ The vehicle can enter the bay without contacting the columns, arms, or nearby equipment.
⛔ Do not operate a lift if you notice loose anchors, damaged arms, leaking hydraulic components, malfunctioning safety devices, or other conditions that could affect safe operation.
📖 For floor-related planning, see the 2 Post Car Lift Concrete Requirements Guide.
2.2 Prepare the Vehicle
Before driving into position:
- Confirm the vehicle's approximate weight and ensure it is within the lift's rated capacity and applicable load-distribution limits.
- Remove loose items that could fall during lifting.
- Check the vehicle manufacturer's instructions for approved lifting points.
- Identify low-hanging components, side skirts, exhaust parts, or other features that could interfere with the lift arms.
- Make sure the driver has a clear view of the columns and can approach the lifting area slowly.
💡 Vehicle weight alone does not determine whether a lift is suitable. Wheelbase, vehicle height, frame or underbody design, and the location of the center of gravity also matter.
3. Position the Vehicle Between the Lift Columns
Correct vehicle positioning is the foundation of a safe lift.
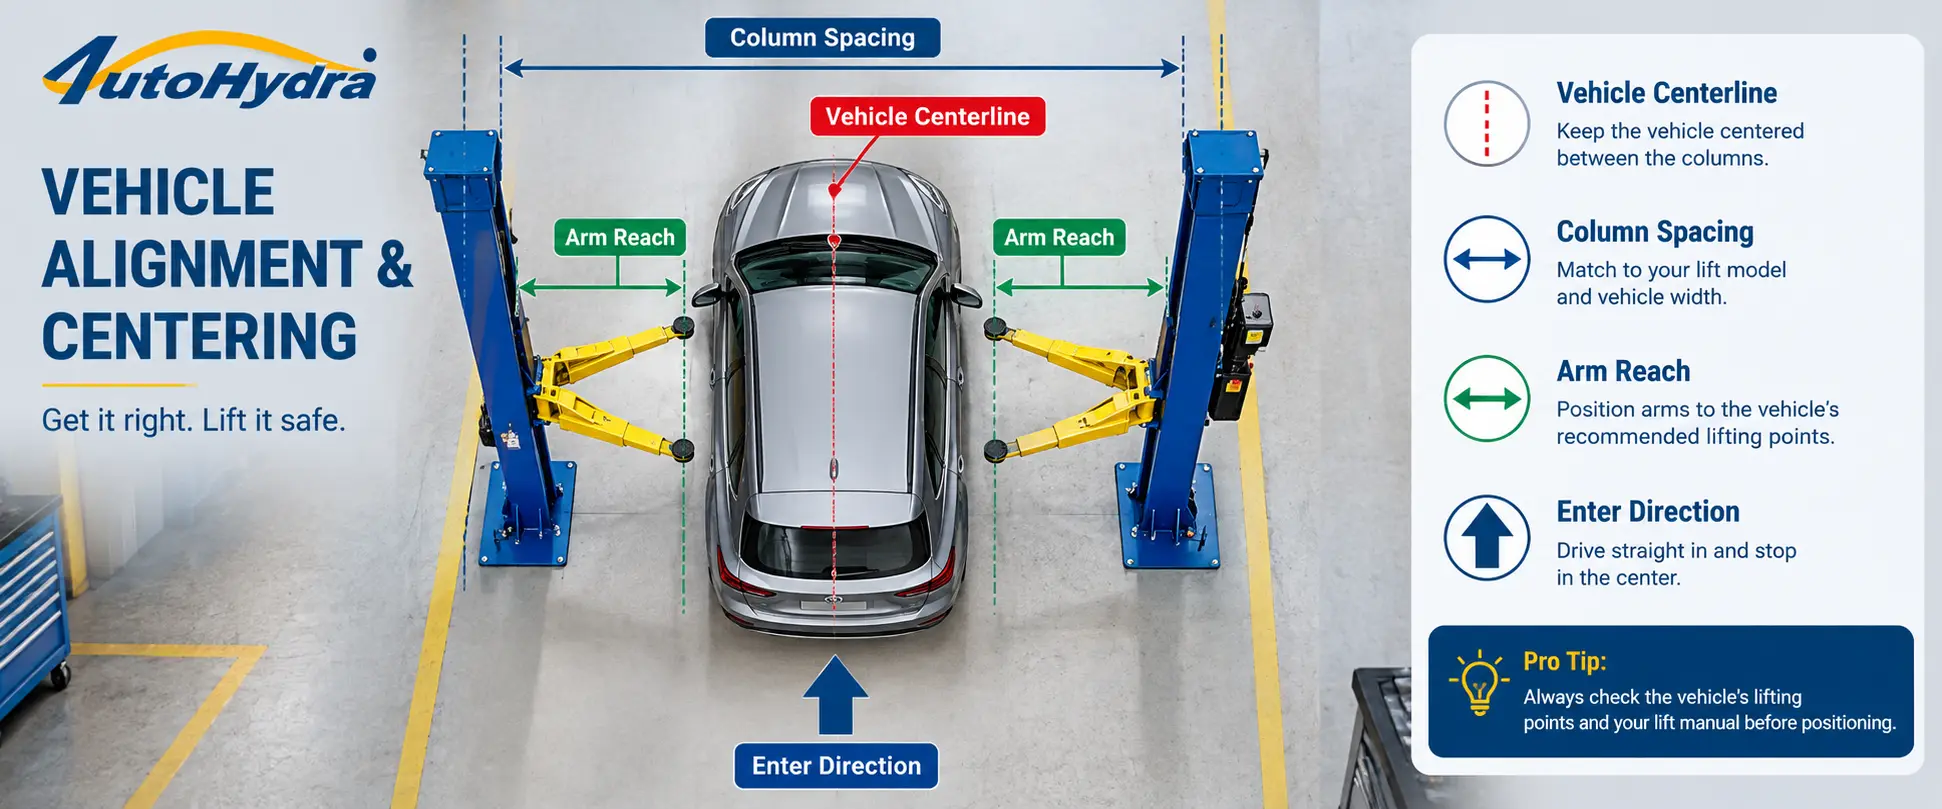
Step 1: Align the Vehicle with the Lift
Drive slowly into the lifting bay and position the vehicle according to the lift manufacturer's instructions. Use the specified reference points and alignment procedure rather than relying on visual estimation alone.
Check that the vehicle is appropriately centered relative to the columns and that the available arm reach can accommodate the approved lifting points.
⚠️ Do not assume that every vehicle should be positioned with its midpoint exactly halfway between the columns. The correct position depends on the vehicle's weight distribution and the lift's approved configuration.
Step 2: Stop and Secure the Vehicle
Once the vehicle reaches the intended position:
- Stop the vehicle completely.
- Apply the parking brake where appropriate.
- Place the transmission in Park or in the gear specified by the vehicle manufacturer's procedure.
- Switch off the engine and remove the key when required by the operating procedure.
- Use wheel chocks where specified by the lift manufacturer or applicable safety procedure.
⛔ Do not leave anyone inside the vehicle while it is being raised unless the equipment and procedure explicitly permit it.
Step 3: Recheck Clearances
Walk around the vehicle and check the space between the body, lift columns, and arms. Pay particular attention to wide vehicles, long-wheelbase trucks, low-profile cars, and vehicles with modified bodywork.
⚠️ If the vehicle cannot be positioned within the lift's approved operating range, do not improvise by extending arms beyond their permitted range or using unapproved adapters.
4. Identify the Vehicle's Approved Lifting Points
The lifting points are the locations designed to receive the load from the lift pads. Incorrect contact can damage the vehicle or cause it to shift.
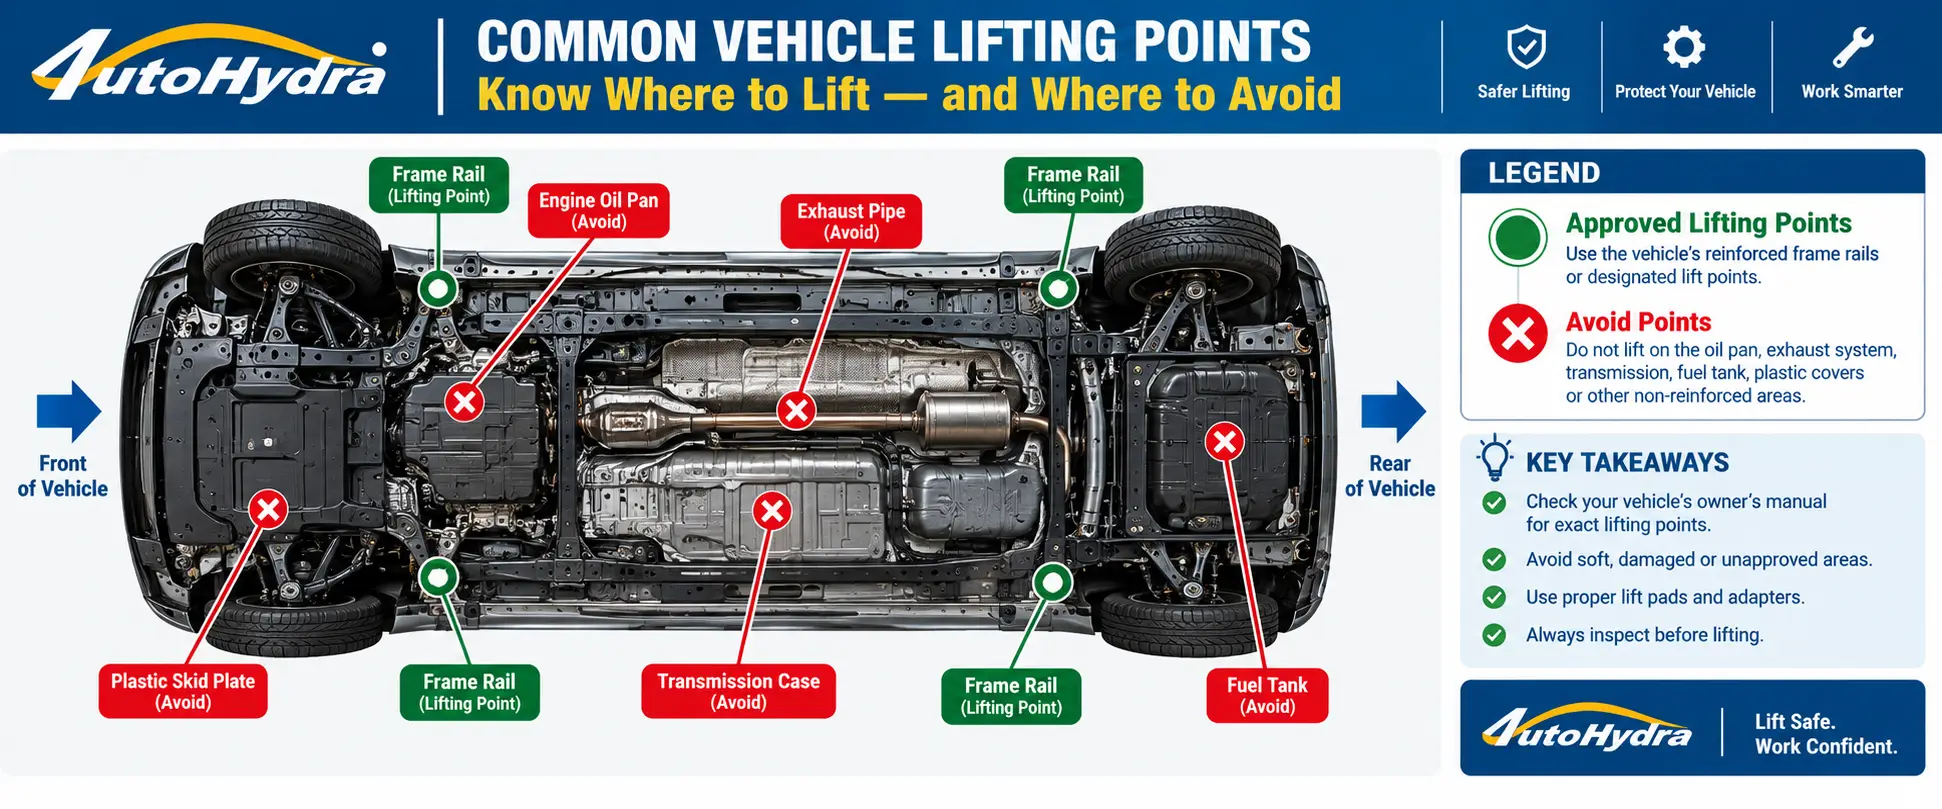
Where Should Lift Pads Contact the Vehicle?
The correct locations vary by make, model, year, and vehicle construction. Depending on the vehicle, approved points may be located at designated reinforced sections of the rocker panels, frame, or underbody.
✅ Always consult the vehicle manufacturer's service information or lifting diagram. Do not assume that a visually strong-looking component is a safe lifting point.
Avoid placing pads against components that are not approved to support the vehicle's weight, including:
- Oil pans and other fluid reservoirs.
- Exhaust pipes and exhaust shields.
- Plastic underbody panels.
- Fuel lines, brake lines, and high-voltage components.
- Suspension or body components not identified as approved lifting points.
⚡ Electric and hybrid vehicles may have model-specific lifting restrictions and high-voltage battery locations. Follow the manufacturer's instructions carefully.
What If the Lifting Points Are Difficult to Reach?
Some vehicles require specific lift-pad adapters or extensions. These must be compatible with the lift and approved for the intended vehicle.
⛔ Never substitute improvised blocks, loose spacers, bricks, or other unapproved materials to compensate for a reach or height problem.
If the correct contact points cannot be reached securely, stop and verify the required equipment and setup before lifting.
5. Position the Lift Arms and Pads Correctly
After identifying the approved lifting points, adjust the arms so each pad reaches its designated contact location.
Step 1: Move Each Arm into Position
Swing or extend each arm according to the lift manufacturer's operating instructions. Keep arms and pads clear of brake lines, body panels, wiring, and other vulnerable components.
Check that the arms are not twisted, forced against obstructions, or positioned outside their permitted operating range.
Step 2: Adjust Pad Height
Adjust the lift pads or approved adapters so they contact the intended lifting points correctly.
Before lifting, verify that:
✅ Each pad is aligned with its designated contact point.
✅ The pad surface is suitable for the vehicle's lifting point.
✅ The arm and pad are securely adjusted.
✅ The contact point is not resting on a loose panel or an unapproved component.
✅ No arm is interfering with a tire, body panel, or underbody part.
💡 The exact pad arrangement and arm-locking procedure vary by lift model. Follow the instructions for your specific equipment.
Step 3: Confirm Arm Locks and Contact
If the lift has automatic arm restraints or other arm-locking devices, confirm that they are operating as specified in the manual.
⚠️ Do not assume that an arm is locked simply because it feels difficult to move. Verify the restraint and pad contact according to the manufacturer's procedure.
6. Perform an Initial Lift and Stability Check
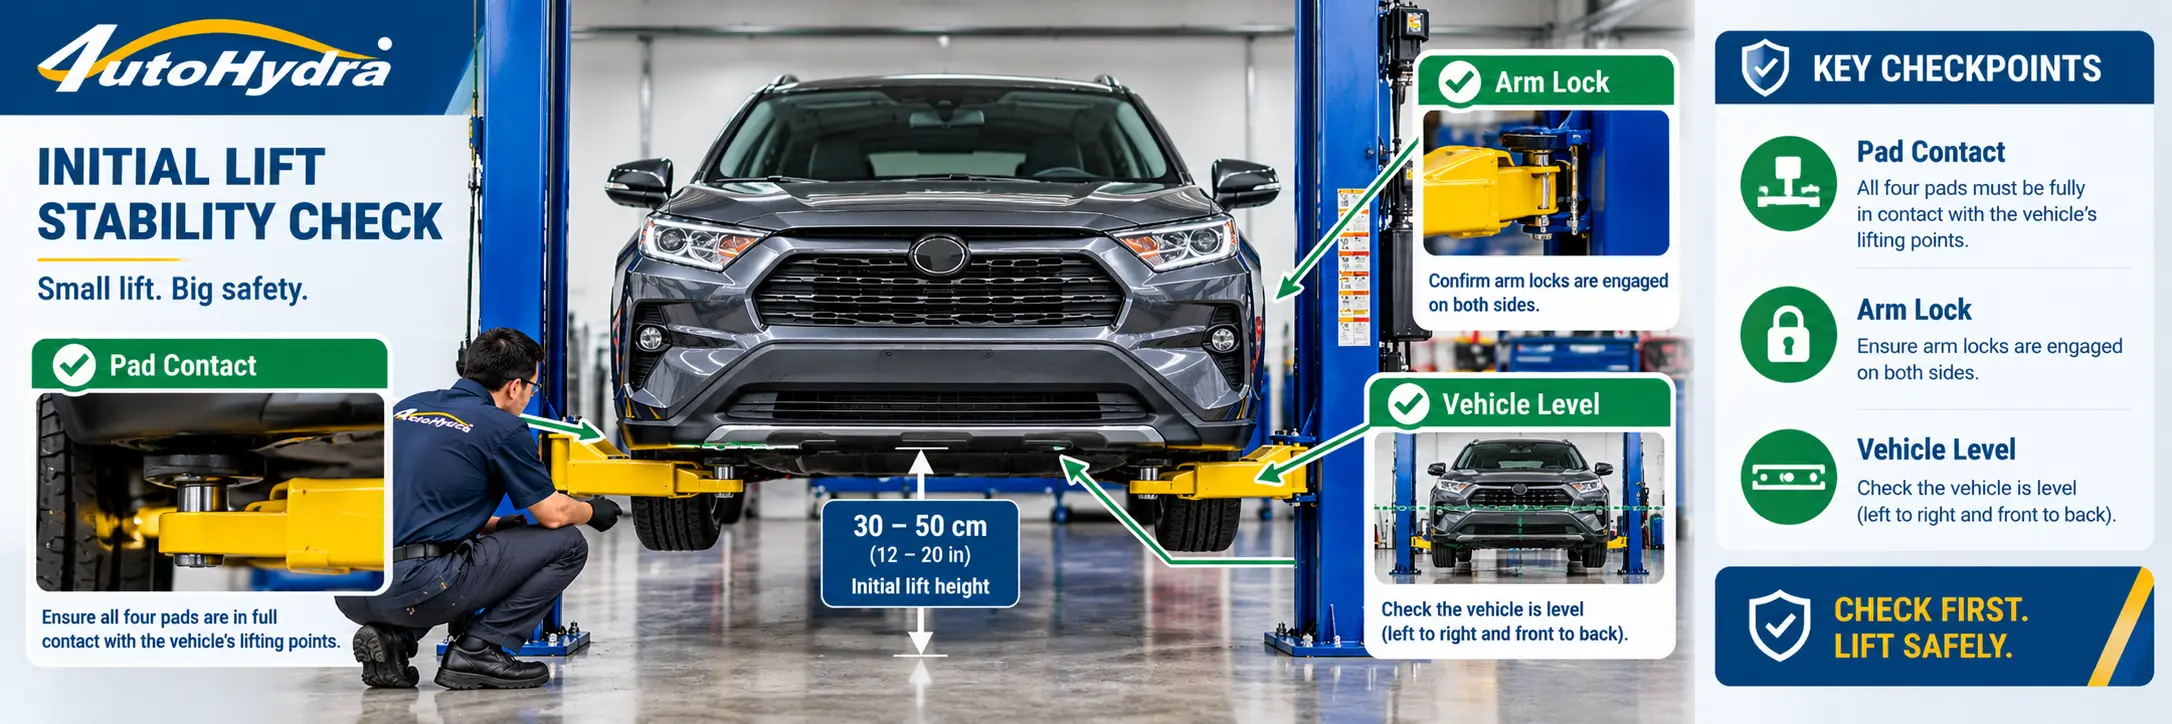
Before raising the vehicle to working height, perform a controlled initial lift.
Step 1: Raise the Vehicle Only Slightly
Operate the lift according to its manual and raise the vehicle only enough to allow the initial stability check specified by the manufacturer.
⛔ Keep people clear of the vehicle and lifting mechanism. Never reach under a vehicle that is suspended during this check.
Step 2: Stop and Inspect
Stop the lift and inspect the vehicle from a safe position.
Check for:
- Pads that have shifted or no longer contact the intended lifting points.
- Arms that have moved or are not secured as required.
- Vehicle tilt, unexpected movement, or signs of unstable support.
- Interference between the vehicle and the columns or arms.
- Any unusual noise or abnormal lift movement.
⚠️ If anything appears incorrect, lower the vehicle fully according to the manufacturer's procedure and correct the setup before trying again. Do not attempt to reposition arms or pads while the vehicle is suspended.
Step 3: Continue Only When the Setup Is Secure
Once the initial check is satisfactory, continue lifting in accordance with the manual. Keep watching for unexpected movement and use the lift's prescribed mechanical safety-lock procedure before working beneath the vehicle.
⛔ Never work under a vehicle supported only by hydraulic pressure. Follow the manufacturer's procedure for engaging and verifying the mechanical safety locks, and never bypass a safety device.
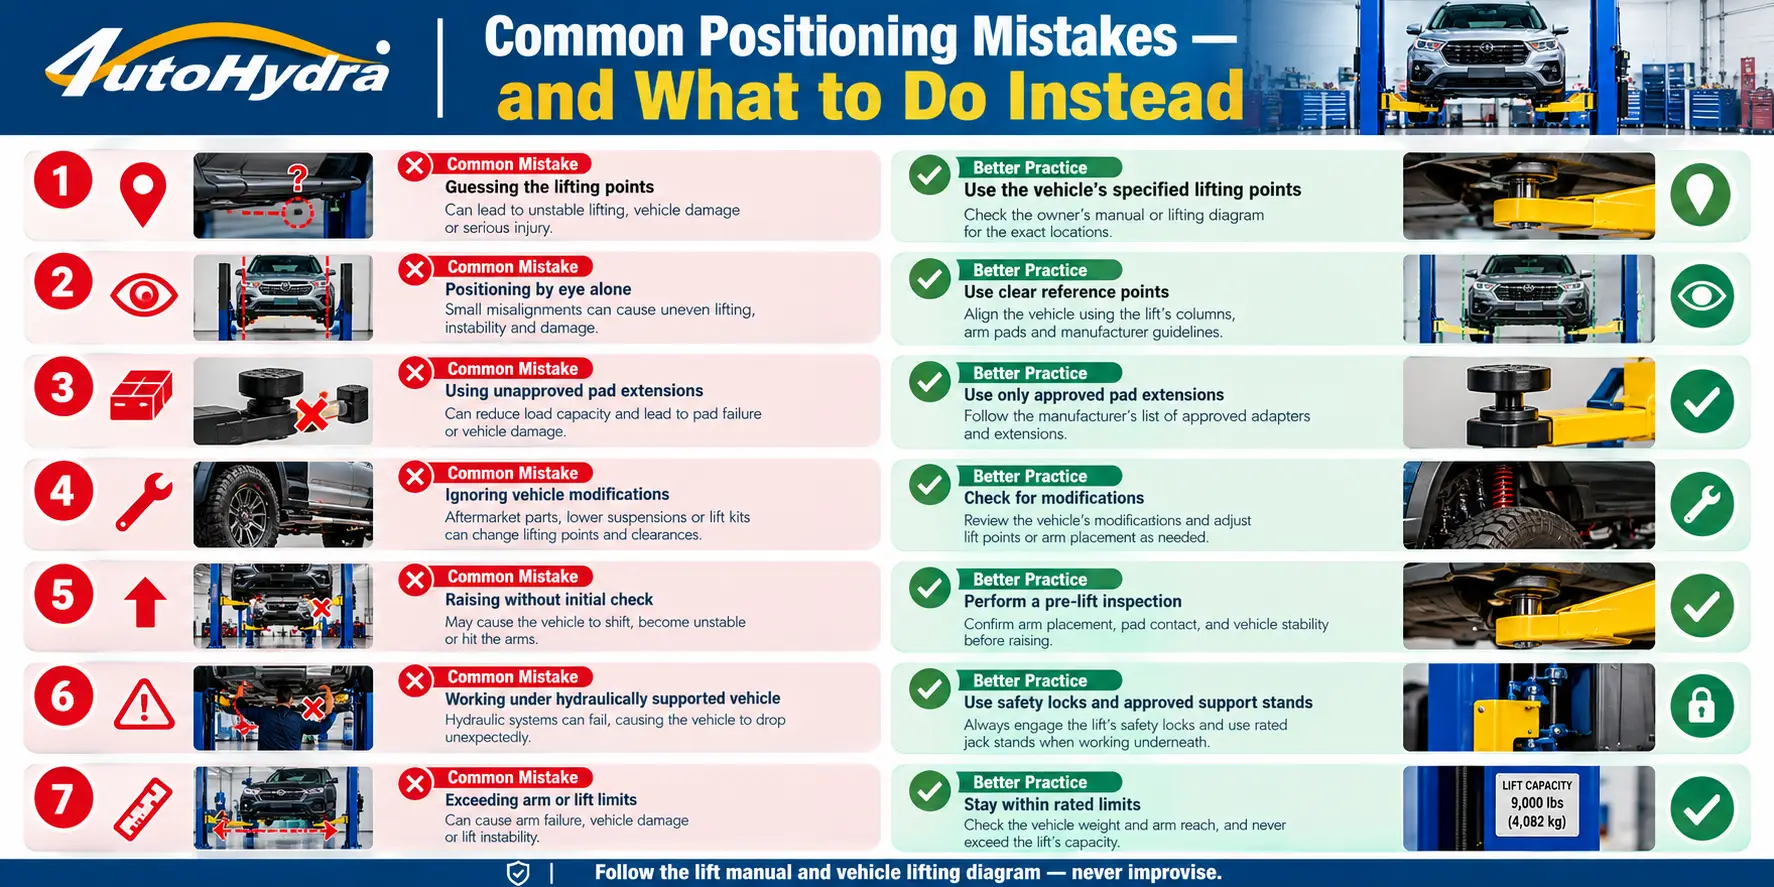
7. Common Vehicle-Positioning Mistakes to Avoid
8. How Vehicle Type Affects Positioning
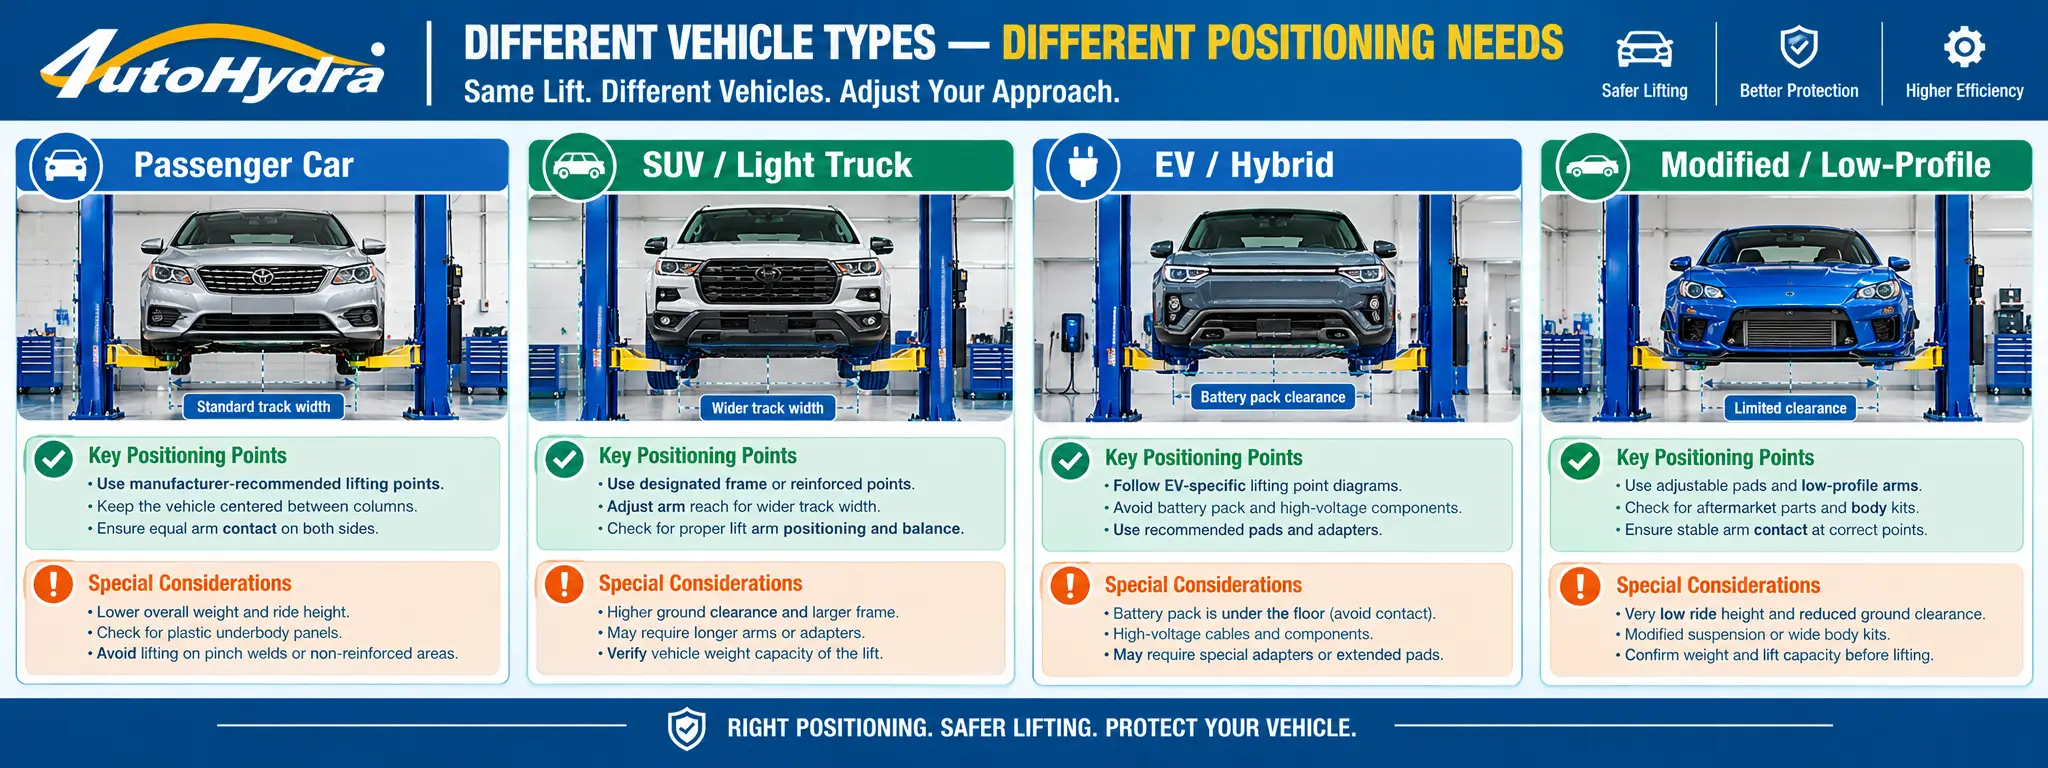
Different vehicles may require different arm arrangements, adapters, and positioning procedures.
🚗 Passenger Cars
Passenger cars often have designated lifting points near reinforced sections of the body or underbody. Low ground clearance can make pad placement more difficult, so check clearance before moving the arms into position.
🚙 SUVs and Light Trucks
SUVs and trucks may have different wheelbases, frame structures, and weight distributions from passenger cars. Verify that the lift's capacity, arm reach, and approved configuration are suitable for the specific vehicle.
⚠️ Do not assume that a lift capable of supporting a vehicle's total weight can automatically support it safely in every arm position.
⚡ Electric and Hybrid Vehicles
Battery packs and high-voltage components can affect where a vehicle may be lifted. Use the vehicle manufacturer's lifting instructions and any required special adapters or precautions.
🔧 Modified or Low-Profile Vehicles
Lowered suspensions, aftermarket side skirts, running boards, and modified underbodies may limit access to the approved lifting points. Do not force arms into place or lift from an alternative point without verified approval.
9. Choose a 2 Post Car Lift That Fits Your Vehicles
Correct positioning begins with selecting equipment that suits the vehicles you service. Before purchasing a lift, compare more than the rated capacity.
Consider:
● Rated capacity: Confirm that the lift is suitable for your heaviest intended vehicle and its load distribution.
● Arm reach and configuration: Make sure the arms can reach the approved lifting points for your vehicle range.
● Column spacing and bay layout: Check vehicle width, wheelbase, door clearance, and working space.
● Lift height and ceiling clearance: Account for vehicle height, the lift's maximum rise, and overhead obstructions.
● Installation requirements: Verify floor suitability, anchoring, electrical requirements, and any model-specific installation conditions.
● Safety features and documentation: Review the operating manual, maintenance instructions, and applicable safety certifications.
📖 For a broader comparison, read the How to Choose the Right Car Lift Buyer's Guide.
You can also compare capacity-focused information in these AUTO HYDRA guides:
⚠️ Confirm the specifications of the exact model before making a purchase. Capacity alone does not establish arm reach, vehicle compatibility, or lifting configuration.
❓ Frequently Asked Questions
How do you position a car on a 2 post car lift?
Position the vehicle according to the lift manufacturer's alignment procedure, secure it, identify the vehicle manufacturer's approved lifting points, and adjust each arm and pad to those points. Perform the required initial lift and stability check before raising the vehicle to working height.
Where do the arms go on a 2 post car lift?
The arms and pads must contact the vehicle's approved lifting points. Their exact locations vary by vehicle make, model, year, and design. Use the vehicle manufacturer's lifting diagram rather than guessing.
Should a vehicle be centered between the two lift posts?
The vehicle should be positioned according to the lift manufacturer's specified alignment and load-distribution requirements. The correct position is not necessarily the geometric midpoint of every vehicle.
Can I lift a vehicle if one lift pad does not sit flat?
Do not proceed if a pad cannot contact its approved lifting point securely. Lower the vehicle if necessary, verify the correct pad or approved adapter, and correct the setup before lifting.
How high should I raise the vehicle for the first check?
Follow the lift manufacturer's prescribed initial-lift procedure. Raise the vehicle only as instructed for the stability check, inspect from a safe position, and lower it fully before correcting any arm or pad placement.
Can I reposition the lift arms while the vehicle is raised?
Do not reposition arms or pads while the vehicle is suspended. Follow the manufacturer's procedure to lower the vehicle fully and reset the arms safely.
Is lift capacity the only factor when choosing a 2 post car lift?
No. Capacity is important, but arm reach, column spacing, vehicle dimensions, weight distribution, lifting-point access, ceiling height, installation requirements, and safety documentation must also be considered.
Need Help Selecting a 2 Post Car Lift?
Get a free application assessment from Auto-Hydra's lift experts — we'll help you match arm reach, capacity, and vehicle compatibility to your shop.
📞 Contact Auto-Hydra | 🛒 Browse 2 Post Car Lifts
✔️ Free consultation · ✔️ Expert lift selection · ✔️ Fast shipping from US warehouses
Recommended News
View all